True control over your smart home means being able to access it from anywhere. This is where secure Home Assistant remote access comes in, turning your local hub into something you can manage from across the street or across the country. It’s about more than just convenience; it’s about giving you real peace of mind.
Why Bother with Secure Remote Access?
A smart home that only works when you’re on your home Wi-Fi is only half a smart home. The real magic happens when you can interact with your system from anywhere. Secure remote access lets you get critical alerts and check in on things while you're out, especially with advanced systems. For example, the IRVINEi OVAL isn't just a smart doorbell camera; it’s an all-in-one home automation hub with a touch screen. This device uses advanced AI to send intelligent alerts, acting as a virtual #aiBodyGuard for your front door. You need remote access to leverage features like this to their full potential.
This isn't just a "nice-to-have" feature; it's essential for anyone who takes their home automation seriously. The numbers back this up, too. The global home automation market was valued at around USD 60.79 billion in 2025 and is expected to explode to USD 166.97 billion by 2035. This growth is all about people wanting better security and more efficiency, which you can read more about on futuremarketinsights.com.
The Real-World Benefits of Remote Control
When you set up remote access the right way, you get some immediate, practical advantages.
- Better Security: You can act on security alerts the moment they happen. If your IRVINEi OVAL detects a person with its AI algorithms, you'll know instantly and can respond using its two-way communication features, a significant upgrade over standard doorbells.
- Smarter Energy Use: Did you forget to turn off the lights? Want to adjust the thermostat before you get home? You can do it all from your phone, which helps cut down on your energy bills.
- Total Convenience: Let a friend in while you're at work, double-check that the garage door is closed, or get the oven preheating on your commute home.
Before you even think about opening up your home network to the outside world, you need to make sure your foundation is solid. Start by securing your WiFi network.
A solid setup is the difference between a smart home that's just a toy and one that's truly intelligent and protected. The methods we’re about to dive into will show you how to build a secure bridge to your home, so you can connect with confidence. To get a better sense of what’s possible, take a look at our guide on open source home automation.
Comparing Your Remote Access Options
Figuring out the best way to get home assistant remote access is all about striking a balance. You're juggling simplicity, security, and how much control you really want over the whole setup. Each method we'll cover has its own unique mix of these things, so it pays to know what you're getting into before you start.
The main players are the official Nabu Casa cloud service, setting up your own Virtual Private Network (VPN), using a reverse proxy, or trying out third-party tunneling services. Each one is built for a different kind of person. Nabu Casa is perfect for convenience, a VPN is for those who prize privacy above all else, and a reverse proxy gives the dedicated tinkerer fine-grained control.
This handy flowchart can help you decide if remote access is even the right path for you in the first place.
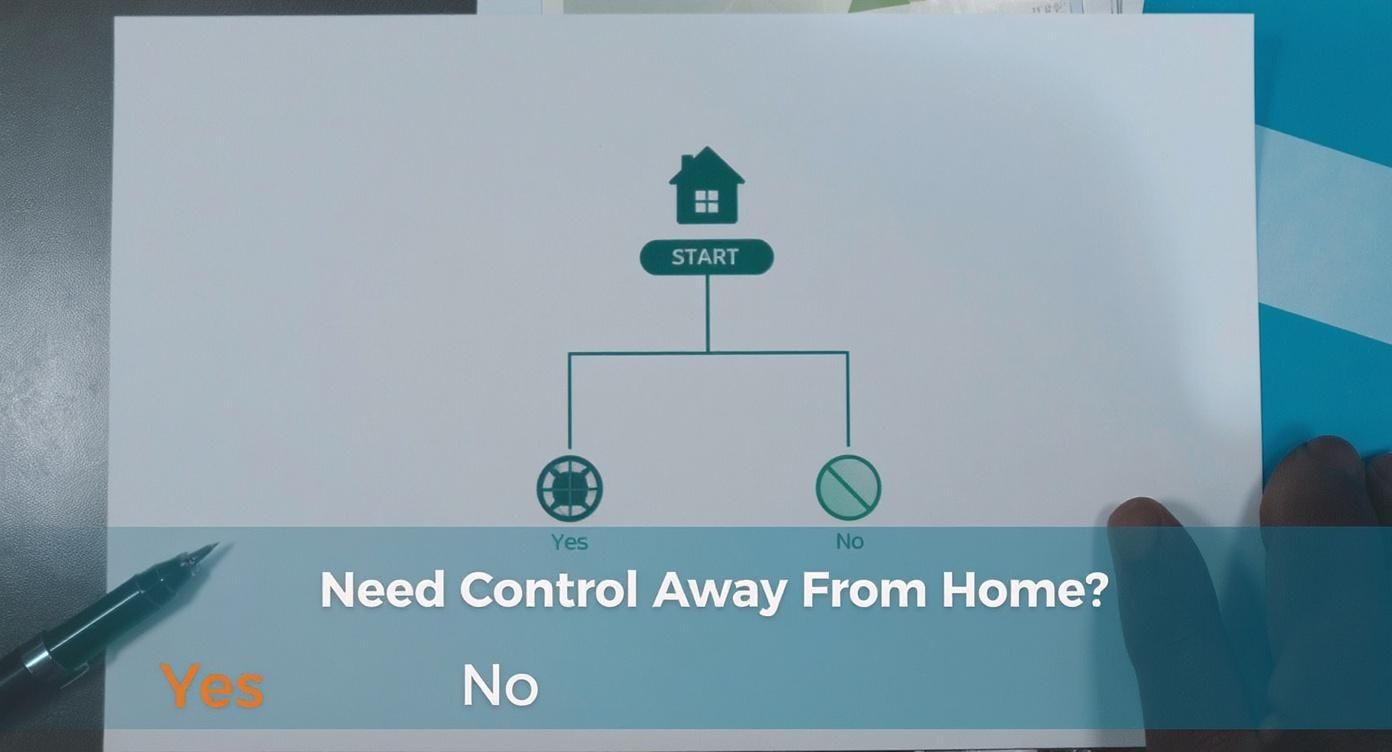
As you can see, the biggest reason people set this up is to check in and control their smart home from anywhere. It's a core part of what makes modern home automation so powerful.
Breaking Down the Options
To make a good choice, you need to see how these methods stack up against one another in the real world. I always tell people to look at four key things: how hard is it to set up, what's the ongoing maintenance like, how secure is it, and what will it cost you?
Home Assistant Remote Access Methods At a Glance
Here’s a quick table to help you compare the main remote access solutions at a glance. Think of this as your cheat sheet for deciding which path is the best fit for your technical skills and security needs.
| Method | Best For | Setup Complexity | Security Level | Typical Cost |
|---|---|---|---|---|
| Nabu Casa | Beginners and those who want to support HA development. | Very Low | High | Monthly Subscription |
| VPN (e.g., WireGuard) | Privacy-focused users who want no public exposure. | Medium | Very High | Free (Self-Hosted) |
| Reverse Proxy | Advanced users who need flexibility and custom domains. | High | High (If configured correctly) | Free (Software) |
| Cloudflare Tunnel | DIY users seeking modern security without open ports. | Medium | Very High | Free (Basic Plan) |
This table shows a clear trade-off: the "free" options usually cost you time, while paid services save you that setup and maintenance headache.
A key takeaway here is that "free" options often require a greater investment of your time for setup and maintenance. In contrast, a subscription service like Nabu Casa trades a small monthly fee for a plug-and-play experience that directly supports the Home Assistant project.
Let's quickly touch on how these actually work. A VPN, for example, creates a secure, encrypted tunnel straight into your home network. When you connect, your phone or laptop acts just like it's on your home Wi-Fi. It’s incredibly secure because your Home Assistant hub is never actually visible on the public internet.
This means only devices you've authorized can even see your system, giving you a serious layer of protection. A bonus is that you can also manage other devices on your home network this way, not just Home Assistant. If you're curious about bringing more devices into your smart home, you might want to read our guide on how IRVINEi syncs with thousands of smart home products.
Now, let's dive deeper into each of these methods so you can find your perfect fit.
Nabu Casa: The Simple and Supportive Choice
If you're looking for the most straightforward, no-fuss way to get home assistant remote access, the official Nabu Casa subscription is tough to beat. Think of it as the "it just works" option. It's specifically designed to sidestep all the intimidating network configurations that can trip up even seasoned tech enthusiasts.
With Nabu Casa, you get a secure, encrypted connection to your Home Assistant hub without ever having to log into your router or mess with its settings.
The real magic here is simplicity. You won't be wrestling with dynamic DNS, port forwarding, or SSL certificates. You just install the integration, sign in, and you're good to go. This plug-and-play setup is perfect if you value your time and want something reliable without the tinkering required by DIY methods.
This screenshot from the official Nabu Casa site sums up its mission perfectly: simple, secure remote access that also helps fund the project's future.

It’s this combination of ease and direct support for Home Assistant that makes it such a popular choice for a huge part of the community.
More Than Just a Secure URL
But Nabu Casa isn't just a simple remote access tunnel. The subscription comes with a few other perks that really round out the experience and make it a powerful part of any smart home.
- Effortless Voice Assistant Integration: One of the best things about it is how easily it connects with Amazon Alexa and Google Assistant. Nabu Casa takes care of all the tricky authentication and device discovery in the background, so you can start controlling your smart home with voice commands almost instantly.
- Directly Funds Home Assistant Development: This is a big one. Your subscription fee doesn't just go to a faceless corporation; it's a direct contribution to the team developing Home Assistant. This financial model helps keep the open-source project thriving, independent, and constantly improving.
When you subscribe to Nabu Casa, you're not just a customer—you're a supporter. The money helps pay for full-time developers, server costs, and the overall health of the entire Home Assistant ecosystem.
Many users find this incredibly compelling. You get a fantastic, easy-to-use service while also giving back to the project that makes your smart home tick. It’s a win-win.
This idea of simplifying control is a core theme in the smart home world. For those looking to manage all their different gadgets in one place, you can learn more about how OVAL's all-in-one smart home app centralizes total home control, an approach that shares the same spirit of convenience as Nabu Casa.
Using a VPN for Maximum Privacy and Control
If you're serious about privacy, a Virtual Private Network (VPN) is the gold standard for home assistant remote access. This method creates a secure, encrypted tunnel directly from your device—whether it's your phone or a laptop—straight into your home network. Once connected, your device acts just like it’s on your local Wi-Fi.
What really sets this apart from other methods is that your Home Assistant instance stays completely hidden from the internet. You aren't opening any ports or exposing anything for automated scanners and attackers to find. Think of it as a private, unlisted road to your digital home that only you have the key to.
This is why it's the top pick for anyone who's comfortable with a bit of tech setup and wants absolute control over their smart home's security. You're not putting any part of your system on the public web.
How Does a VPN Work for Home Assistant?
Getting a VPN up and running is easier than ever, thanks to modern protocols like WireGuard. The usual route involves installing a VPN server, either as an add-on in Home Assistant OS or on another device on your network, like a Raspberry Pi.
After setting it up, you'll use a client app on your phone or computer to connect. Once that secure link is established, every bit of data traveling between your device and home network is fully encrypted.
The real game-changer with a VPN is that you get access to your entire home network, not just Home Assistant. You can securely log into your router's admin page, pull files from a NAS, or check on other local devices—all through that single, safe connection.
This all-encompassing access is a huge differentiator. It truly makes your remote device feel like an extension of your home network.
Choosing the Right VPN Solution
Several VPN protocols can get the job done, but a few stand out in the Home Assistant community for their performance and ease of use.
- WireGuard: This is the fan favorite for a reason. It's incredibly fast, lightweight, and the official Home Assistant add-on is a breeze to set up. Adding new devices is as simple as scanning a QR code.
- Tailscale: Built on top of WireGuard, Tailscale creates a mesh network that makes connecting dead simple, even if your home internet is behind a tricky firewall (like CGNAT). It often removes the need for any manual port forwarding, making it a fantastic, user-friendly choice.
- OpenVPN: As the old guard of VPN protocols, OpenVPN is rock-solid and widely trusted. It might be a little heavier on system resources than WireGuard, but its stability is legendary.
At the end of the day, choosing a VPN for home assistant remote access means you're putting privacy first. It takes a bit more effort to get started, but the payoff is a connection that's practically invisible to the outside world, keeping your smart home truly private.
Reverse Proxies: The Power User's DIY Gateway
For anyone who loves to tinker and wants total control over their setup, a reverse proxy is pretty much the gold standard for home assistant remote access. Think of it as your home network's personal bouncer. It stands at the door, checks IDs (requests), and directs traffic to the right place—in this case, your Home Assistant—without ever letting anyone see what's going on inside.
This method hits a sweet spot. It gives you that clean, professional-looking URL (like home.yourdomain.com) that cloud services offer, but with the rock-solid security of keeping your home network's front door hidden from the public internet, much like a VPN does.
Fine-Tuning Your Connection
Getting a reverse proxy running means pointing a domain name you own to your home’s public IP address. Since most home internet connections have dynamic IPs that change, you’ll typically pair this with a Dynamic DNS service to keep things in sync.
The go-to tool for this inside the Home Assistant community is Nginx Proxy Manager, often run as a simple add-on. It gives you a clean web interface to handle all the tricky parts, like routing traffic and even grabbing free SSL certificates to encrypt your connection.
What's really great about this approach is its flexibility. Once you have it set up for Home Assistant, you can easily use it to securely expose other services running on your network. Want a private photo gallery or a media server? Just create another subdomain and point it to the right place. It all runs through one secure, managed entry point.
With a reverse proxy, you're not just a user; you're the gatekeeper. You decide the rules. You can add extra security layers, block sketchy IP addresses with tools like fail2ban, and enforce modern security standards—a level of control you just don't get with other methods.
This is exactly why it's a favorite for those of us who like getting our hands dirty. You’re not trusting a third party with your keys; you’re building your own fortress.
Is a Reverse Proxy the Right Fit for You?
All that power comes with responsibility. This is the most hands-on method, and you're the one in charge of keeping it secure and running smoothly. It demands a decent grasp of networking basics and a willingness to stay on top of updates.
Here’s what you’re signing up for:
- Domain Management: You'll need to buy and manage your own domain name.
- SSL Certificates: While tools like Nginx Proxy Manager and Let's Encrypt make getting free SSL certificates a breeze, it's on you to make sure they're installed and renewing properly.
- Security Vigilance: A small mistake in your configuration could open a security hole. It's vital to follow security best practices and keep everything patched.
If you thrive on having complete command over your digital life and don't mind the technical learning curve, a reverse proxy is an incredibly satisfying and secure path to home assistant remote access. It's the ultimate DIY solution for crafting a remote connection that's perfectly tailored to your smart home.
Cloudflare Tunnels: The Modern Security-First Approach
Services like Cloudflare Tunnels represent a major shift in how we think about secure home assistant remote access. Instead of you opening a door for the internet to come in, this method creates a secure outbound connection from your server to Cloudflare’s massive global network. What does that mean for you? It means you never have to open a single inbound port on your home router.
This one change completely flips your security situation. With no open ports, you've essentially hidden your home IP address from the outside world. Automated vulnerability scanners and bad actors simply can't find your Home Assistant instance because, from their perspective, it doesn't exist online. It’s a fantastic DIY solution for anyone who wants serious security without the headache of managing a reverse proxy or paying a monthly subscription.
Setting Up a Secure Tunnel
Getting a Cloudflare Tunnel running is surprisingly simple, especially if you use the official Home Assistant add-on. You'll need your own domain name first, which you can then add to a free Cloudflare account. After that, the add-on pretty much walks you through creating and authenticating the tunnel.
Once it's up, Cloudflare handles all the routing. Traffic to your custom domain gets sent through its secure network and delivered straight to the add-on running on your Home Assistant. The entire connection is encrypted from end to end, keeping everything private and secure.
The real magic of Cloudflare Tunnels is getting enterprise-grade security features in a free, easy-to-use package. You get things like DDoS protection and content caching right out of the box, making your connection not just safer, but faster too.
The Power of Mobile Control
This approach is tailor-made for how we use our smart homes today. Think about it: our smartphones are the remote control for our lives. In fact, recent stats show that smartphones are the main control point for 61% of smart home systems. This reliance on mobile makes secure, encrypted cloud platforms a necessity, not just a nice-to-have. You can read more about these smart home trends and how they're changing user habits.
Cloudflare Tunnels builds that perfect secure bridge for mobile access. It gives you the ironclad security of a VPN but with the sheer convenience of a simple, clean URL. For managing your home assistant remote access from your phone, it’s truly the best of both worlds.
Common Questions, Answered
Let's tackle some of the most frequent questions that come up when you're figuring out how to get secure remote access to your Home Assistant setup.
Is It Actually Safe to Expose Home Assistant to the Internet?
That's the big question, isn't it? Putting any part of your home network on the internet comes with some risk, but the methods we've covered are designed to keep that risk incredibly low.
The safest routes by far are using a VPN or a service like Cloudflare Tunnels. Why? Because they don't require you to poke any holes (open ports) in your home router's firewall. This effectively makes your Home Assistant setup invisible to the automated bots and scanners constantly probing the web for easy targets.
If you go with a reverse proxy, the security responsibility shifts more to you. It's a solid method, but you absolutely must lock it down. That means using strong, unique passwords, setting up two-factor authentication (2FA), and keeping everything updated to patch any vulnerabilities that pop up.
Do I Need to Pay for a Static IP Address?
Nope, you almost certainly don't. Most of us have a dynamic IP address from our internet provider, meaning it changes from time to time. This used to be a huge headache for remote access, but not anymore.
This is exactly what Dynamic DNS (DDNS) services were made for. A DDNS provider gives you a hostname (like my-smarthome.duckdns.org) that always points to your home network, no matter how many times your IP address changes behind the scenes.
A favorite in the Home Assistant community is DuckDNS. It’s free, works like a charm, and integrates beautifully, so you can set it and forget it.
Can I Get to My IRVINEi OVAL Doorbell From Anywhere?
You bet. Once you've integrated your IRVINEi OVAL into Home Assistant, any remote access you set up will automatically extend to it. What makes OVAL different is its built-in touch screen and function as an all-in-one smart home hub, not just a doorbell. From anywhere, you can leverage its AI-powered features.
This means you can get intelligent security alerts from your ai doorbell camera, check the live video feed, use the two-way talk feature, and even control other connected smart devices directly through the OVAL hub's interface, all from your phone. It's a true #allInOneHomeSecuritySystem that combines #advancedHomeSecurity with a central #smartHomeControlHub.
Ready to bring your smart home together with a hub that does it all? The IRVINEi OVAL is a touch-screen doorbell, security system, and central controller for over 2,700 devices, all in one. Find out more about what it can do for your home.
